Using EstateVal to quickly produce accurate and detailed valuations for millions of different securities is incredibly easy. Double-click the EstateVal shortcut on your Desktop to run the program.

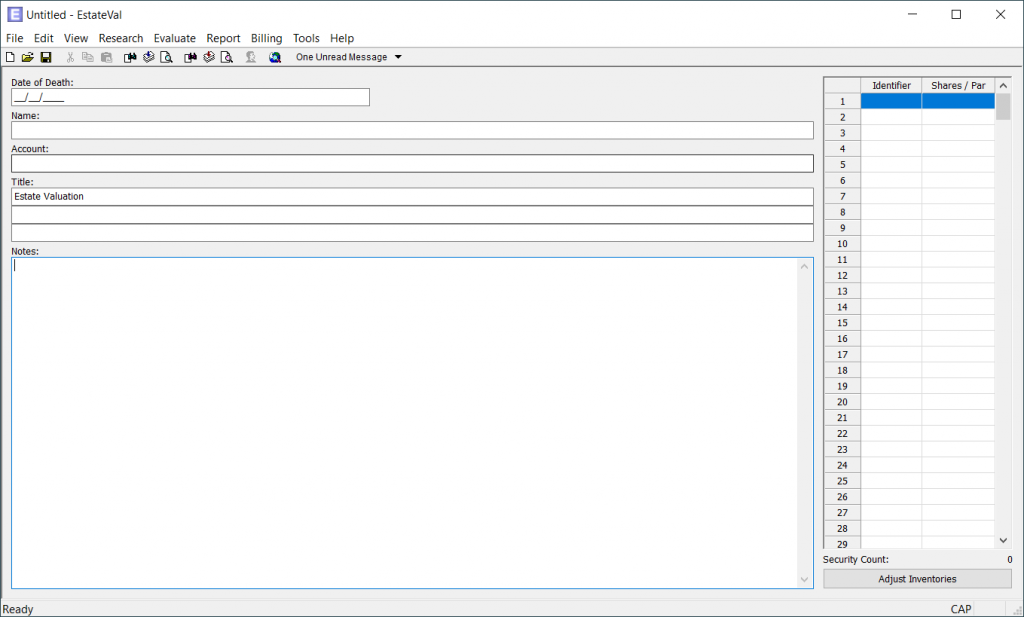
EstateVal always opens to the Main Screen, where portfolio data can be entered or edited.
To begin a new portfolio, enter a date in the Date of Death field (corresponding, of course, to when the decedent passed away); the associated Alternate Date will appear as soon as you do. Next, enter the decedent’s name in the Name field, any account number or code into Account, and perhaps edit the Title that will appear on the final report. You can use Notes to add arbitrary information to the portfolio—anything you need. They’ll appear on the report as well.
(EVP Systems does not transmit or store any decedent Personally Identifiable Information [PII], and details such as the name and account are not sent to our servers. They are only stored locally, in the portfolio file we will create. In fact, only the evaluation date and the security identifiers are sent; not even the lot sizes.)
Next, click on a row of the Grid, on the right side of the window. This is where the list of securities that make up the portfolio will go. To start entering a holding, simply type in the security’s CUSIP, SEDOL, ticker or other identifier into the first field in the row. Hit Tab or Enter when you’re done; EstateVal will warn you if it doesn’t recognize the input. Next, enter the number of shares or par-value of the security (or the size of the holding for items like cryptocurrency, precious metals, or foreign currencies). Hit Tab or Enter again to move to the next row.
Once you’ve entered a lot, you can move it to different positions in the Grid. Just click on the row you want to move, and then either select Edit → Shift Row Up or press Ctrl+↑, or Edit → Shift Row Up or Ctrl+↓. The lot will move up or down as appropriate, switching places with the lot directly above or below it. You can also insert an empty row by selecting Edit → Insert Row, or pressing Ctrl+I; you can delete a row (whether it’s empty or has a security in it), by selecting Edit → Delete Row, or pressing Ctrl+D. For other ways to handle the portfolio’s securities, see the Tools section below.
And that’s it! Repeat the entry process for every lot in the portfolio. By default, EstateVal caps the size of portfolios to 500 entires, but that’s adjustable, up to 10,000.
The next step is to save the portfolio: select either File → Save, or press Ctrl+S. A standard save dialog box will come up and you can enter a filename to save the data as, and click Save.
Evaluations
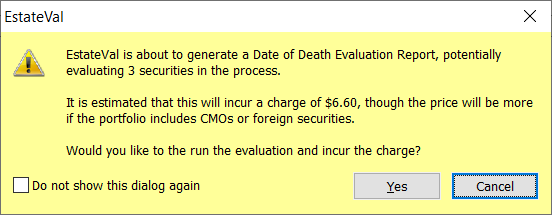
Now we’re able to actually evaluate the portfolio and generate a report. Either select the Evaluate → Date of Death menu item, or press Ctrl+E, and this dialog box will appear:

This message tells you the type of report that’s about to be run, how many securities EstateVal thinks it needs to evaluate, and how much it thinks the evaluation will cost. You can either click Yes or press the Y key to start the evaluation. (And if you get tired of seeing this dialog box when you’re used to the software, just click the box next to “Do not show this dialog again” before you click Yes and it will stop appearing.)
While the evaluation runs, a progress bar will appear and show you how far along the work is. When it finishes, a Print dialog will appear, and if you press OK, it will print a billing record of the evaluation to your default printer. You can click Cancel to not print a hard-copy of the record—it’s saved to disk and can be re-generated later. (You can also change a preference to prevent this dialog from appearing at all; we’ll get into that later.)
Reports

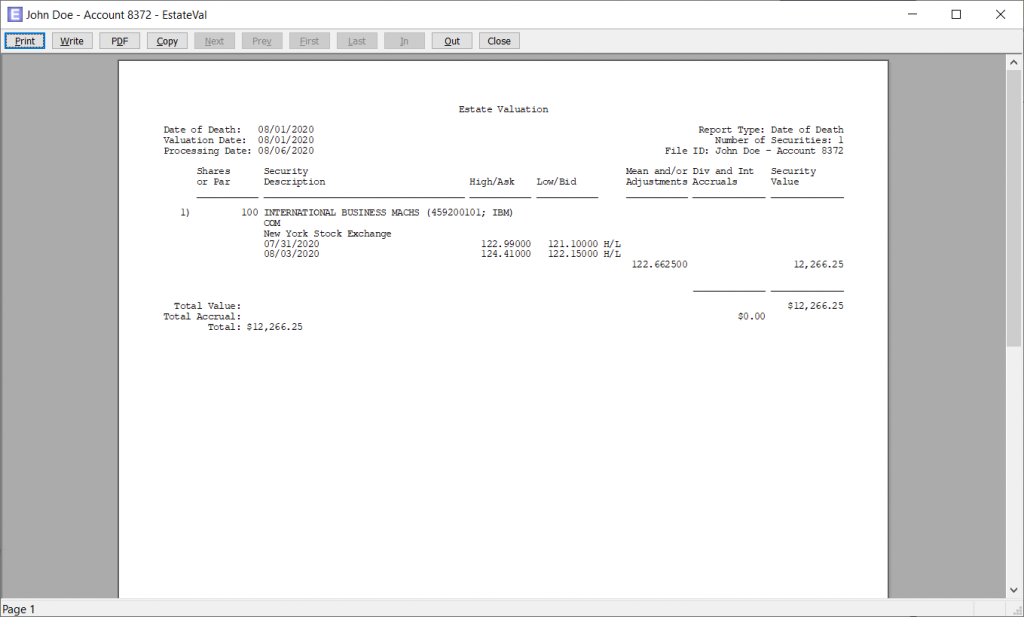
Finally, the report! EstateVal displays the first page of the report for you to inspect. You can zoom in by clicking on the report or using the In and Out buttons; you can page through the whole thing if there’s more than one page by using the Next, Prev, First, and Last buttons; you can print it with Print, save it as a word processor file with Write, save it as a PDF file with PDF, save it as an Excel file with Excel, and copy the text onto the clipboard to be pasted elsewhere with Copy. To close the report, click Close or press the Esc key or click the ✕ in the upper-right corner.
When the report closes, you will be returned to the Main Screen. From here, if your work is done, you can exit EstateVal (via either the File → Exit menu item, or clicking the the ✕ in the upper-right corner of the window).
But you can also re-generate the report at any time by selecting the Report → Date of Death menu item. If you edit the Name or Account or other data on the Main Screen, the changes will be reflected in the newly generated report.
If, however, you change the Date of Death, or add security identifiers, you’ll need to re-evaluate the portfolio before re-generating the report. EstateVal only charges you for the first time a security is evaluated for a date in a portfolio, so changing the Date of Death and re-evaluating will re-price each security. If you leave the Date of Death the same and just add a security, re-evaluating will just price the new addition.
To see a full list of all the reports evaluated for this portfolio on various Dates of Death, select the Report → List… menu item.
Alternate Date Evaluations and Reports
Now that you have a Date of Death report, you might also want to generate one for the Alternate Date. If the inventory of the portfolio hasn’t changed between the Date of Death and Alternate Date, it’s incredibly simple: just select Evaluate → Alternate Date or press Ctrl+A. You’ll get the same dialogs and alerts as with a Date of Death evaluation, but the report will be for six months later. EstateVal will even automatically adjust your lot sizes for any splits that happen between the Date of Death and the Alternate Date. You can then re-generate the report, review the billing record, and print or save the output exactly as with the Date of Death.
If there have been changes to the portfolio between the Date of Death and the Alternate Date, please see the next tutorial—about advanced EstateVal use—for how to add the transactions.
Billing Records
If you didn’t print the billing record, or if you want to see it again, just click the Billing → View Record… menu item. A dialog of months will appear and you can either double-click on the month you’re interested in, or select it and click on OK. Next, a dialog of individual billing records for that month will appear. Double-click the record you’re interested in—or, again, select it and click OK—and the record will appear on screen. From there, you can print or save or copy it, like an EstateVal report.
If you want to print or export (as a spreadsheet) a whole month of billing records, to review your charges or re-bill your clients, you can select Billing → Print Month… and Billing → Export Month…, respectively.
Tools
There are lots of little helper functions in EstateVal, things to make entering, editing, and working with your portfolio easier.
Tools → Find… (or Ctrl+F) brings up a dialog box that allows you to search your portfolio data, by identifier or name, or by any number of post-evaluation issues.
Tools → Sort offers various ways to sort your lots: by security identifier, by their associated CUSIP or SEDOL, by their name, or by their security type grouping like-assets together.
Tools → Look Up lets you easily look up some of the more obscure security identifiers that EstateVal can price: Put/Call options (Ctrl+L), foreign currencies (Ctrl+U), cryptocurrencies (Ctrl+R), and commodities / precious metals (Ctrl+M). For each, select the row on the Grid where you want the new lot to appear, and then select the type of asset you’re looking to enter. For Put/Call options, enter the elements that define the option—ticker, and click Look Up. For all the others, just start typing the name of the item into the search box, and then select the item when the list has been narrowed down; click Insert to add it to the Grid with its proper identifier.
Finally, Tools → Options opens up a dialog with all the EstateVal configuration preferences available. You can find out the details about each by clicking the Help button in the lower-left of each tab.
Files
When you save an EstateVal portfolio, you’re creating a file on your local disk drive. It has a .EVP extension, and contains all the data about a single specific portfolio—not just what you entered, but also any evaluation data that has been retrieved from our servers and that you’ve paid for. You should be careful when handling these files! They’re valuable! Because EVP Systems doesn’t collect decedent PII, we cannot recover or re-create these files for you if they’re lost or destroyed—we don’t collect any information other than the security identifiers and the evaluation date, and even then, we don’t know which identifiers are grouped into a single portfolio.
By default, they’re saved into is a folder named EVP Systems inside your Documents folder. This default can be changed (via the Tools → Options → Standard → Data Drive and Path preference), but wherever you put them, you should be consistent so they’ll be easy to find again. You should back up your EVP Portfolio files on a regular basis, so you’ll still have copies if something goes wrong.
Since EVP Portfolio files collect all the information about a portfolio in a single file, they’re easy to copy, e-mail, or move—just treat them like a word processing document, or a spreadsheet.
To load an existing portfolio into EstateVal, you can either select File → Open…, or press Ctrl+O, or just double-click on the portfolio’s icon.
You can now create detailed, accurate Date of Death reports with EstateVal!