This article is the second in a series about some of the less-well-known features available in EstateVal and the other EVP Office applications. Even if you’re a regular user, you’ll probably find something useful!
The whole reason EstateVal exists is to produce reports. The software makes the process of generating them as easy as possible, but that’s really just a nice extra—the reports are what you’re after: accurate, detailed, complete. Oh, and one more thing: flexible.
EstateVal has tons of way to get reports exactly as you need them.
Main Screen
The most obvious place to add something custom to your report is on the main screen—the Notes field. The Notes field allows you to enter any text you need, and it will be added as end-notes to your reports. Decedent details, explanations of specific securities, or any information that makes the report clearer. (And you don’t need to worry about privacy: EstateVal doesn’t transmit the notes off your computer. They only appear in the portfolio file saved to your hard drive and on the report itself.)
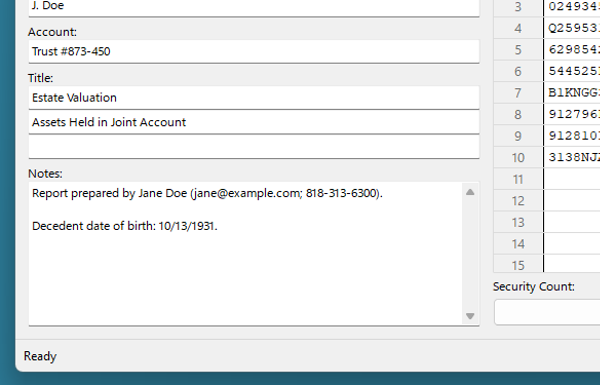
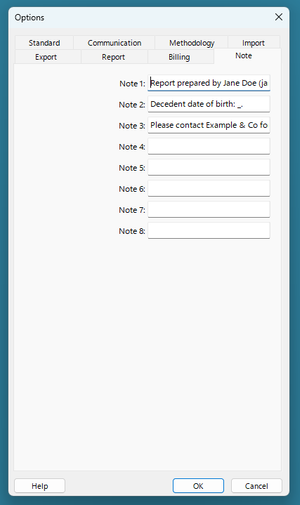
If you find yourself repeatedly adding the same text to Notes, you can also build up to eight unique macros that make entering it much easier. Just click on the Tools menu, select Options…, click the Note tab, and enter your text in each field. You could add, for instance, “Report prepared by Jane Doe (jane@example.com; 818-313-6300)” or “Decedent date of birth: _.“
Now, close the dialog and select Tools → Notes and you’ll see each of your notes as menu items—select one and it appears in the Notes field. You can also press and hold the Alt key and then press F1 through F8 to add the associated note without using the menu, no matter where your input cursor is on the main screen. If your phrase has an underscore in it—like the second example above—it will be highlighted and focused when added to the Notes field, so you can instantly start typing to replace it with custom information.
These macros are saved per EstateVal installation, so they’ll be available for any portfolio you’re working on, new or old.
Report Appearance
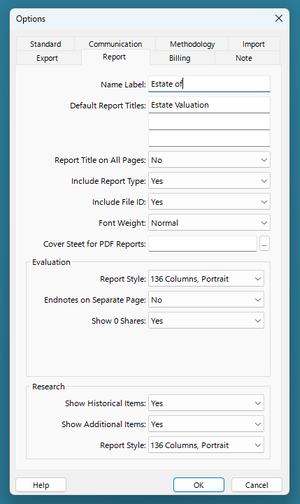
There are over a dozen ways to change the look of an EstateVal report, depending on your needs. First, go to Tools → Options… → Report.
You can change the default label for the name of the decedent, or the default title for new portfolios—all three lines, later editable from the main screen—or if that title appears on all the pages of the report. You can define if the report type (“Date of Death,” “Alternate Date,” etc.) appear on the report itself, or if the filename of the portfolio is in the header.
You can even set the font to be bolder, if the printed report appears too light.
There’s also “Cover Sheet for PDF Reports“, a field that takes a path to an existing PDF, to add the beginning of each report you output as a PDF. Just click on the button with the three dots and select any PDF you’d like prepended to your reports. More on this later!
You can even change the report’s format—the default is 136 columns in portrait mode, but there are an additional half-dozen styles, including simplified layouts and landscape orientation. There’s a way to put any notes you’ve entered for a portfolio on a separate sheet of paper instead of at the bottom of the last page of the report, or to exclude any lots that have zero shares.
Report Preview
Once you’ve evaluated a portfolio, a preview appears, showing on the screen what the report will look like when you send it to the printer. But there’s a lot you can do from here, too!
Write
For instance, clicking the “Write” button allows you to save the report as a file, either as word processor file (Rich Text Files are compatible with Word and other word processors) or as plain text (just click the “Save as type” field in the Write dialog, and select “Text Files”).
Having the report as an editable file is handy if you want to make any adjustments to it, like changing the font or including it in other documents.
Clicking “PDF” will save the report as a PDF, the universal standard for storing and sending printable documents.
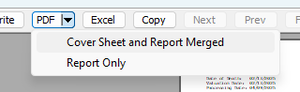
Remember the “Cover Sheet for PDF Reports” field in the section about the Reports options tab? If you’ve entered the path to a PDF document there, clicking “PDF” will merge the two—your cover page and the report output—into a single document and save it. This allows you to automatically include anything you need on the reports, in any format the PDFs can show—company-branded cover pages, disclaimers with fonts in a specific size, or anything else you might need.
If you’ve got a cover sheet file defined, but want to skip including it for a particular report, just click the down-arrow on the right side of the button—that will drop down a menu that allows you to pick if the output should be the cover sheet and the report merged (the default behavior) or just the report (as if you hadn’t set a cover sheet in the Report options).
Excel
Just like it’s handy to have a report in a word processor format, the EVP Office applications can also output them as Excel files. Just click the “Excel” button to save them this way.
This button is actually a short-cut to the Excel export format—it creates the report in the standard layout in .XLSX format. If you want Excel output either as a CSV, or in a simplified one-line-per-lot format, just select the appropriate item from Tools → Options… → Export, and then select File → Export → From [Application]… to save them.
Copy
The “Copy” button will take the report and put a plain-text copy of it into your clipboard, in case you want to paste it into another document.
Other Buttons
The other buttons are ways to navigate the print preview—moving to the next or previous page, jumping to the first or last, or zooming in and out.
Hopefully these tips will help you use the reports in EVP Office faster and easier than ever before. If you’ve got questions—or have your own report tips you want to share—don’t hesitate to get in touch with our Support Department at support@evpsys.com or (818) 313-6300.
We’ll have more good-to-know features soon!